Browse Admin Console
- Dashboard overview
- Insights overview
- Sites Overview - Network Deployments
- Policies Overview - Create and Edit
- Custom Lists overview
- Clients Overview - Device Agents and Profiles
- Users Overview - Directory Users and Personas
- Organizations Overview - MSP Tenant Management
- Lookup Tool Overview
- Query Log Overview
- Settings Overview - Account Administration
- Help & Support Overview
- Signing In - Login, 2FA, and Password Reset
- Two-factor authentication (2FA)
- Add system users (role-based access)
- Check domain classification with the Lookup Tool
- Configurable objects and their associations
- Configure notifications
- Working with organizations (multi-tenant)
- Working with policies
- Content categories
- Security categories
- Application categories (Zero Trust app management)
- Working with allow and block lists
- Zero Trust TLD Filters
- Safe Search explained
- Safe Search supported search engines
- YouTube Restricted Mode explained
- Custom block pages
- Prevent DNS bypass
- Don't mix DNS providers
- Active Directory group policies
- Entra ID group policies
- Tracking individual users
Policies Overview - Create and Edit
Create and edit ScoutDNS filtering policies: pick threat, content, and application categories, tune Safe Search, and read each policy's Secure Score.
A policy is a reusable set of filtering rules. It decides what DNS traffic ScoutDNS blocks or allows: which threat, content, and application categories are off-limits, plus controls like Safe Search, YouTube restriction, ad blocking, and Zero Trust TLD filtering. This article covers creating and editing policies; for attaching them to WANs, LANs, and client profiles, see Working with policies.
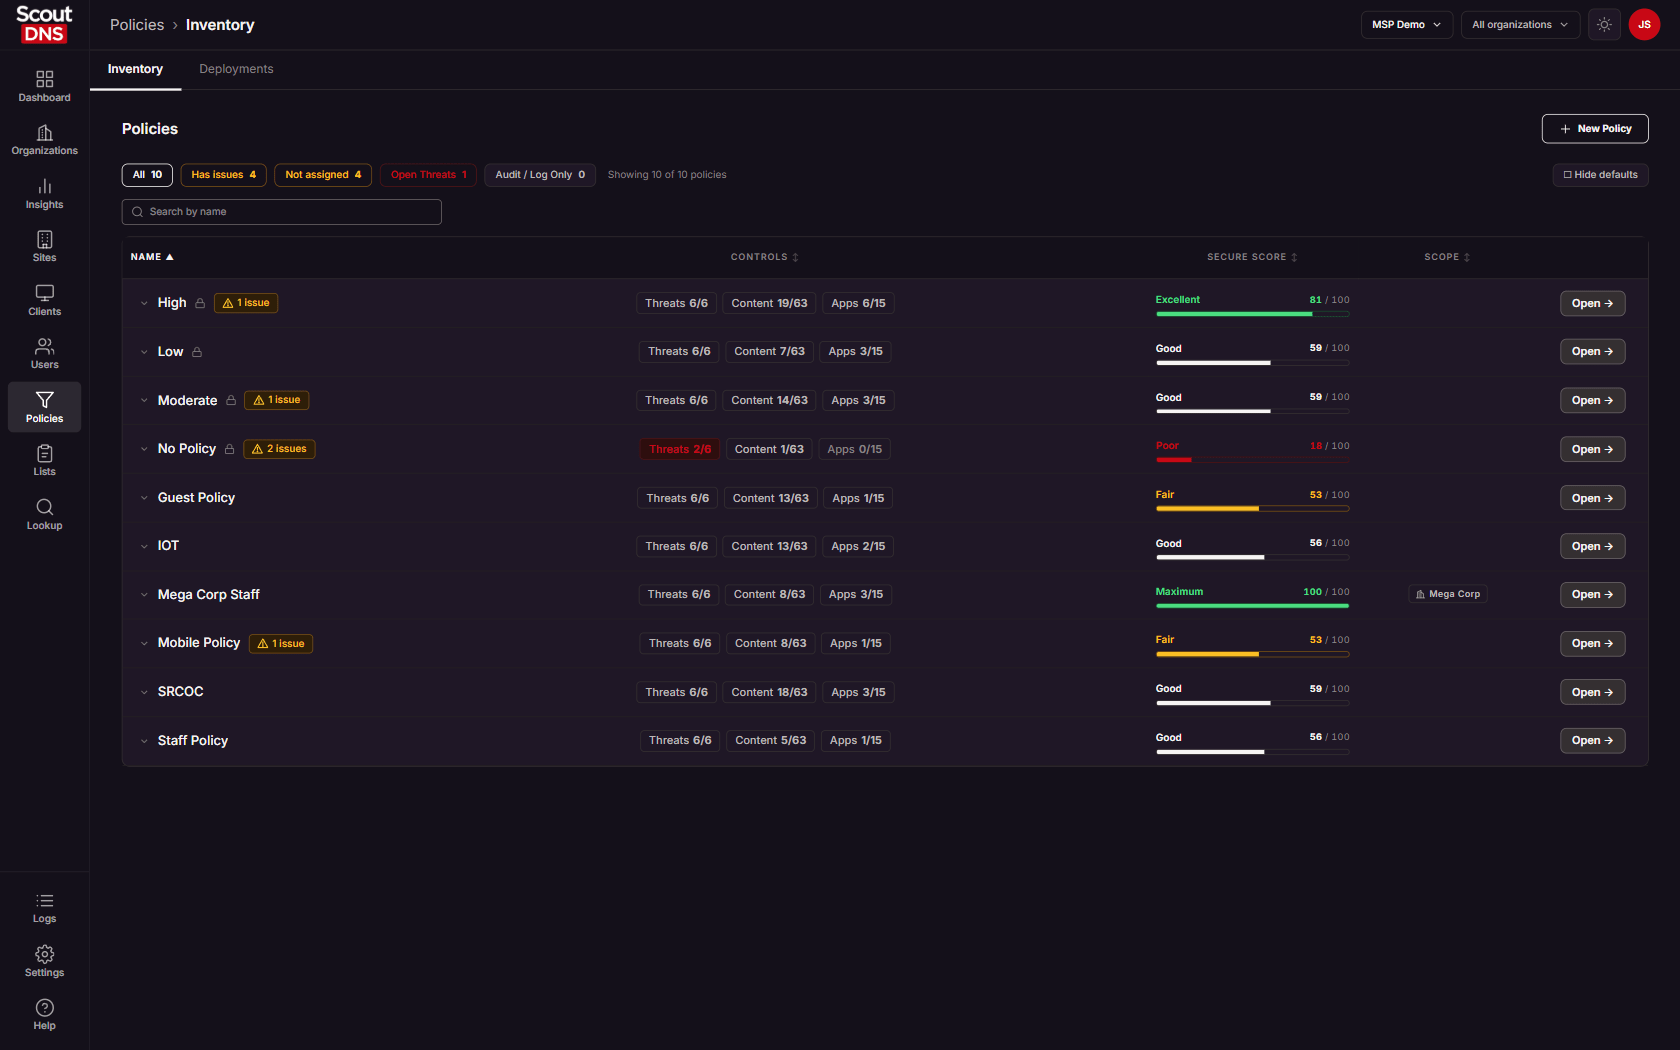
The Policies page has two views. Inventory is a scannable table of every policy with a health score and coverage warnings. Deployments is the flip side: a single list of every place a policy is currently attached.
[!NOTE] Everyone can view policies, but only Admins and above can create, edit, or delete them, or change a deployment. Operators with a viewer or org-operator role see the page in read-only form.
Inventory
The Inventory table lists your policies. Each row shows:
- Name, with a lock icon on built-in templates and an amber chip when the policy has coverage gaps.
- Controls: three pills, Threats, Content, and Apps, each showing how many categories are blocked out of the total.
- Secure Score: a 0 to 100 rating of how much the policy is doing (see below).
- Scope: an organization badge on policies that belong to a specific organization.
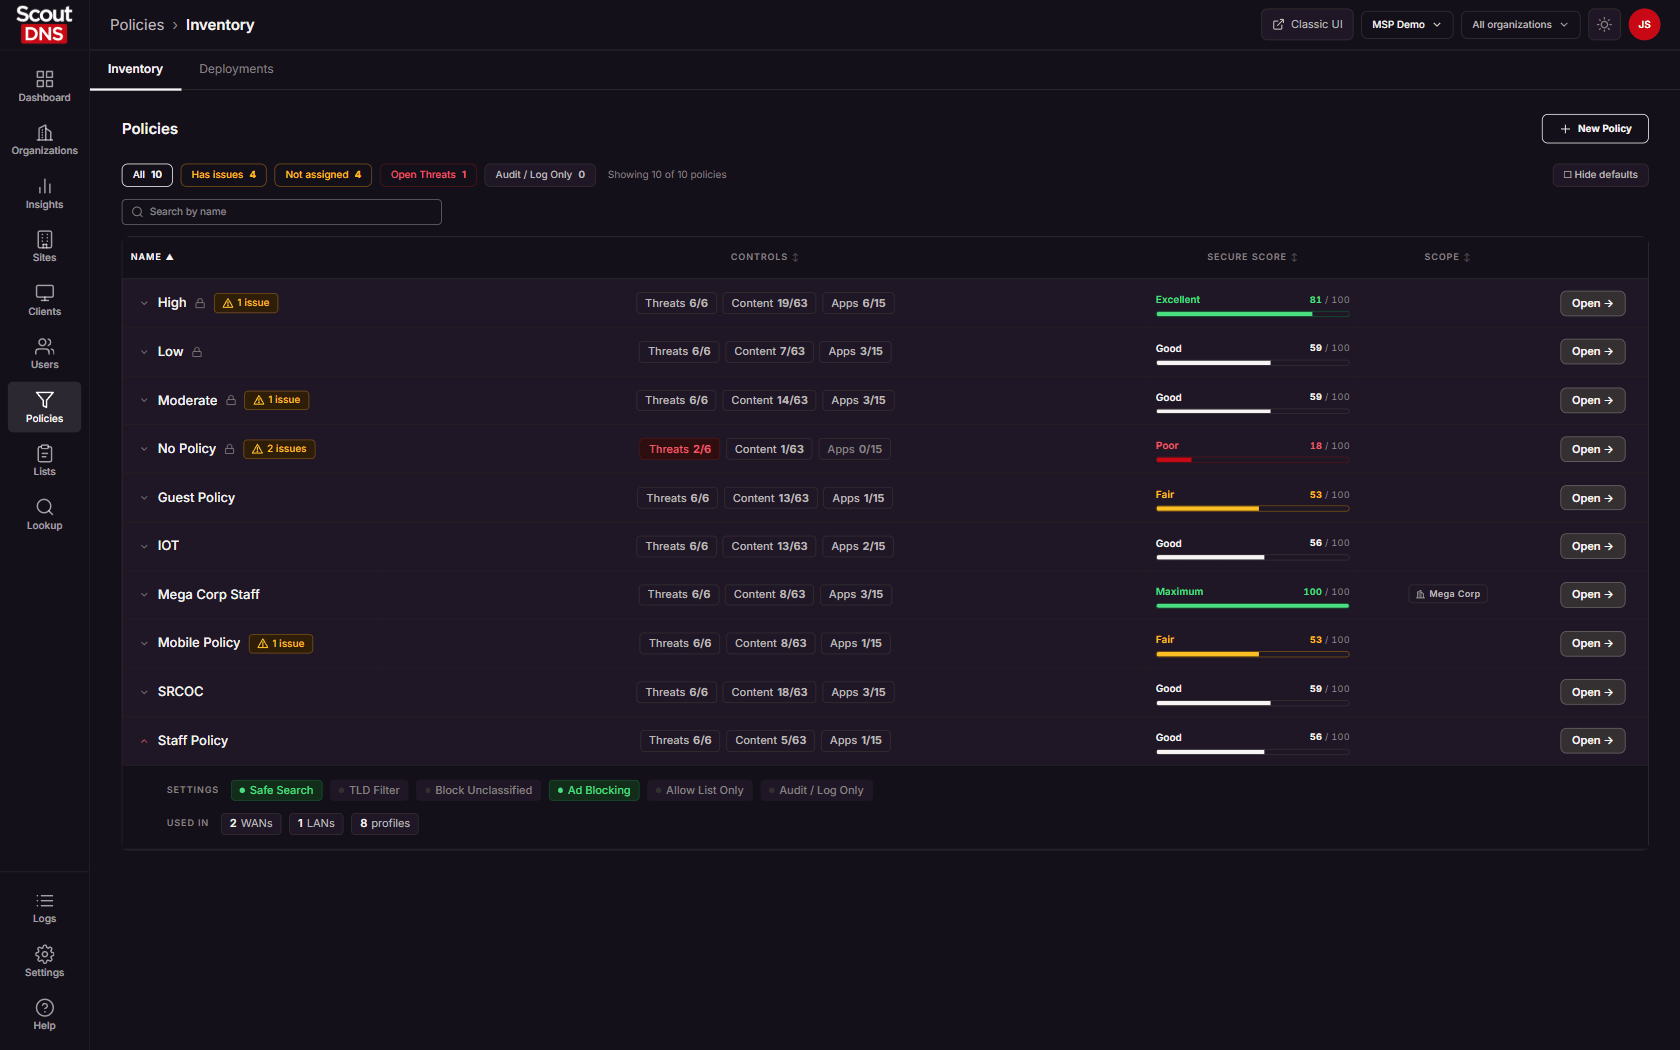
Filter chips across the top narrow the list to Has issues, Not assigned, Open Threats, or Audit / Log Only, and a Hide defaults toggle tucks the built-in templates away. Click any row to expand it and see the policy’s settings at a glance and a Used in list of everywhere it is deployed.
Secure Score
The Secure Score rates a policy from 0 to 100 across five tiers (Poor, Fair, Good, Excellent, Maximum). It rewards defense in depth, not just threat blocking.
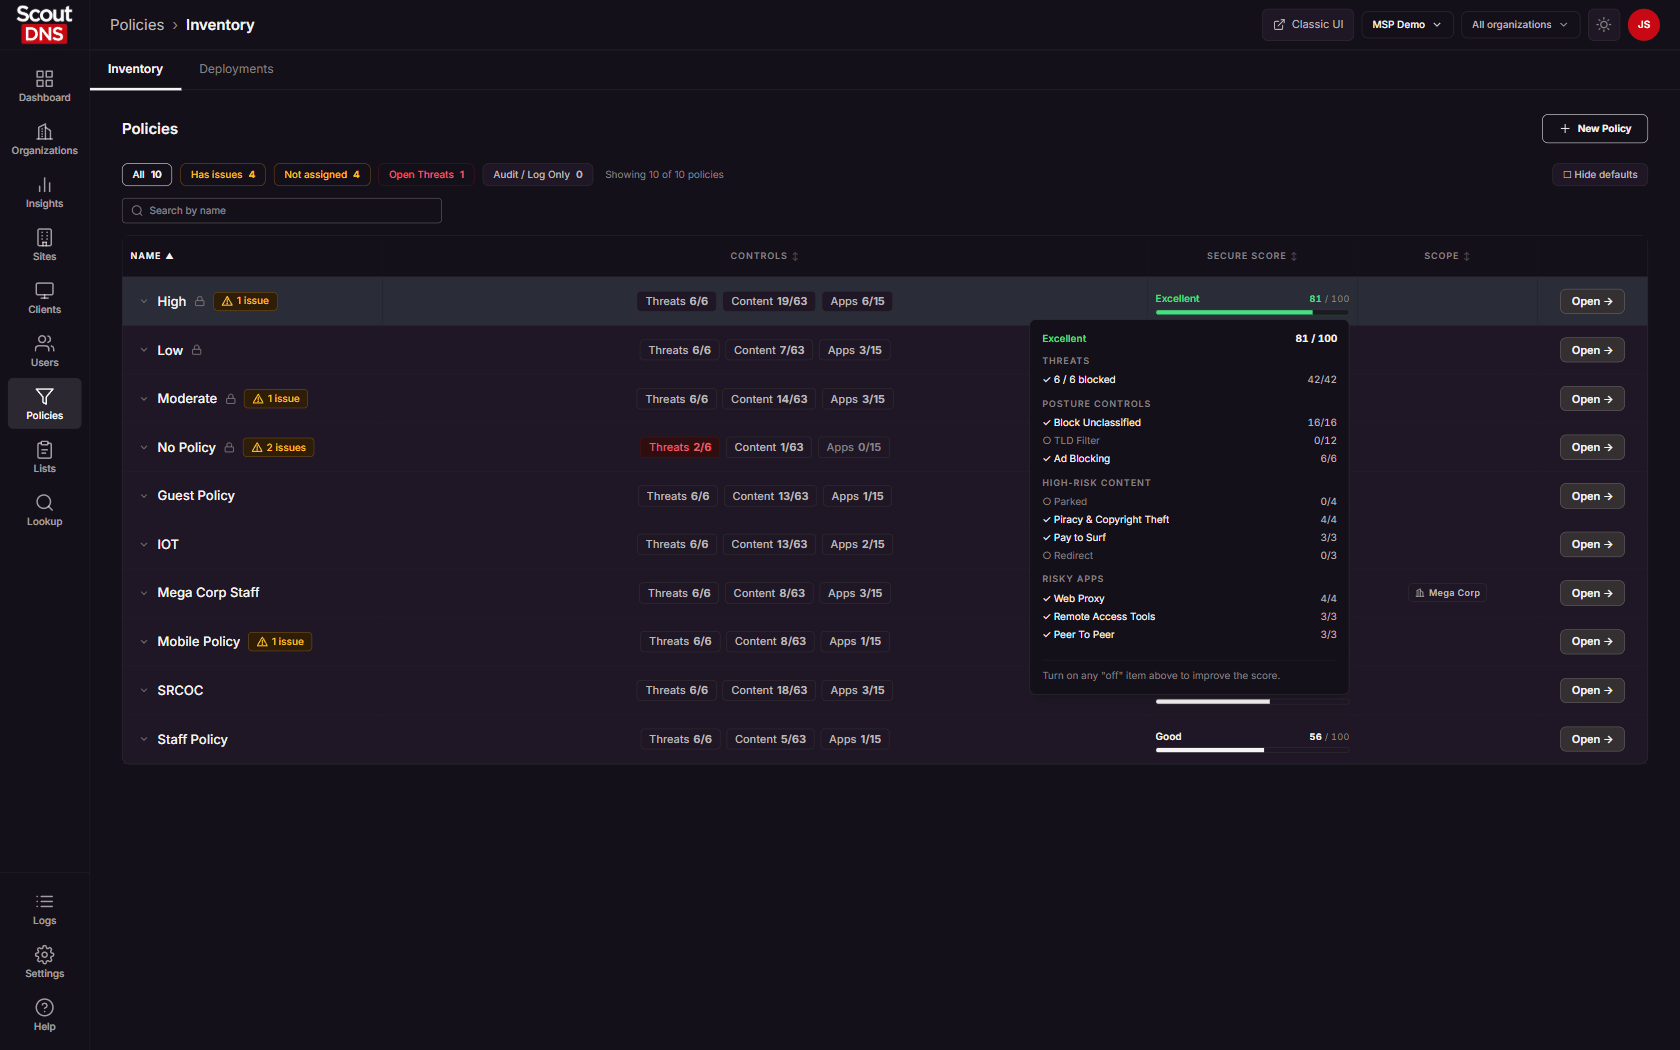
[!IMPORTANT] Blocking all six threat categories on its own only reaches the low 40s. That is by design. To raise the score, also turn on Block Unclassified, Zero Trust TLD filtering, and Ad Blocking, and block the high-risk content categories (such as Parked, Piracy, Pay to Surf) and risky applications (such as Web Proxy, Remote Access, Peer to Peer).
Two modes change how the score reads:
- A policy in Audit / Log Only mode logs what it would block instead of enforcing, so its score shows Log Only.
- A policy in Allow List Only mode denies everything except its allow list, so a category-based score does not apply and shows N/A.
Built-in policies
ScoutDNS ships read-only template policies (such as Low, Moderate, High, and No Policy). They are marked with a lock icon and pinned to the top of the list. You cannot edit or delete them, but you can attach them to a deployment or use one as the starting point for a new policy with Copy a policy (below). No Policy is a valid choice that applies no filtering at all.
Building a policy
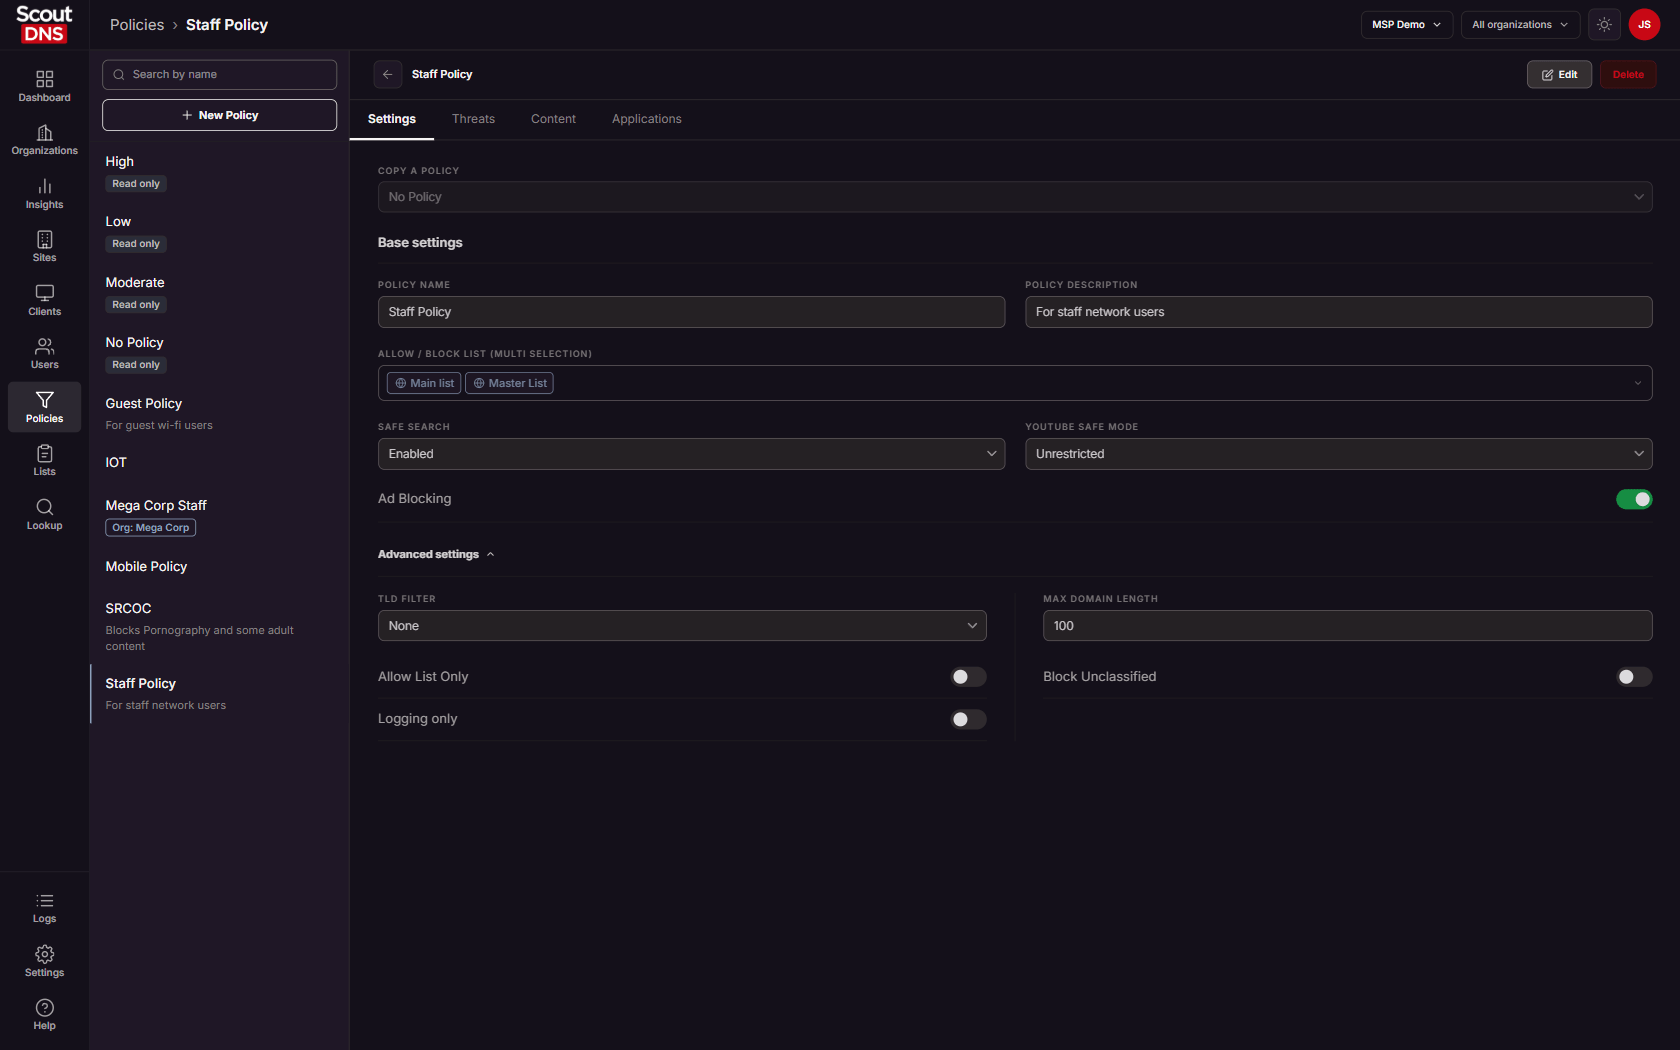
New Policy opens a blank policy in the editor, with all threat categories blocked and content and applications open. Give it a Policy name and an optional description, set what it blocks on the tabs below, and Save.
To change an existing policy, open it from the left rail and click Edit. The editor is read-only until then; if the toggles do not respond, press Edit first.
Copying settings from another policy
Copy a policy pulls another policy’s settings into the one you are working on, which saves rebuilding a similar rule set by hand. It is available when creating a new policy and when editing an existing one; in view mode it stays disabled.
Picking a source asks you to confirm with Replace policy settings? before anything changes, because it overwrites the current settings. The policy you are editing keeps its own name; only the settings come across.
Choosing what to block
The Threats, Content, and Applications tabs are grids of category buttons. A red, bold button is blocked; a plain button is allowed. Click a category to toggle it.
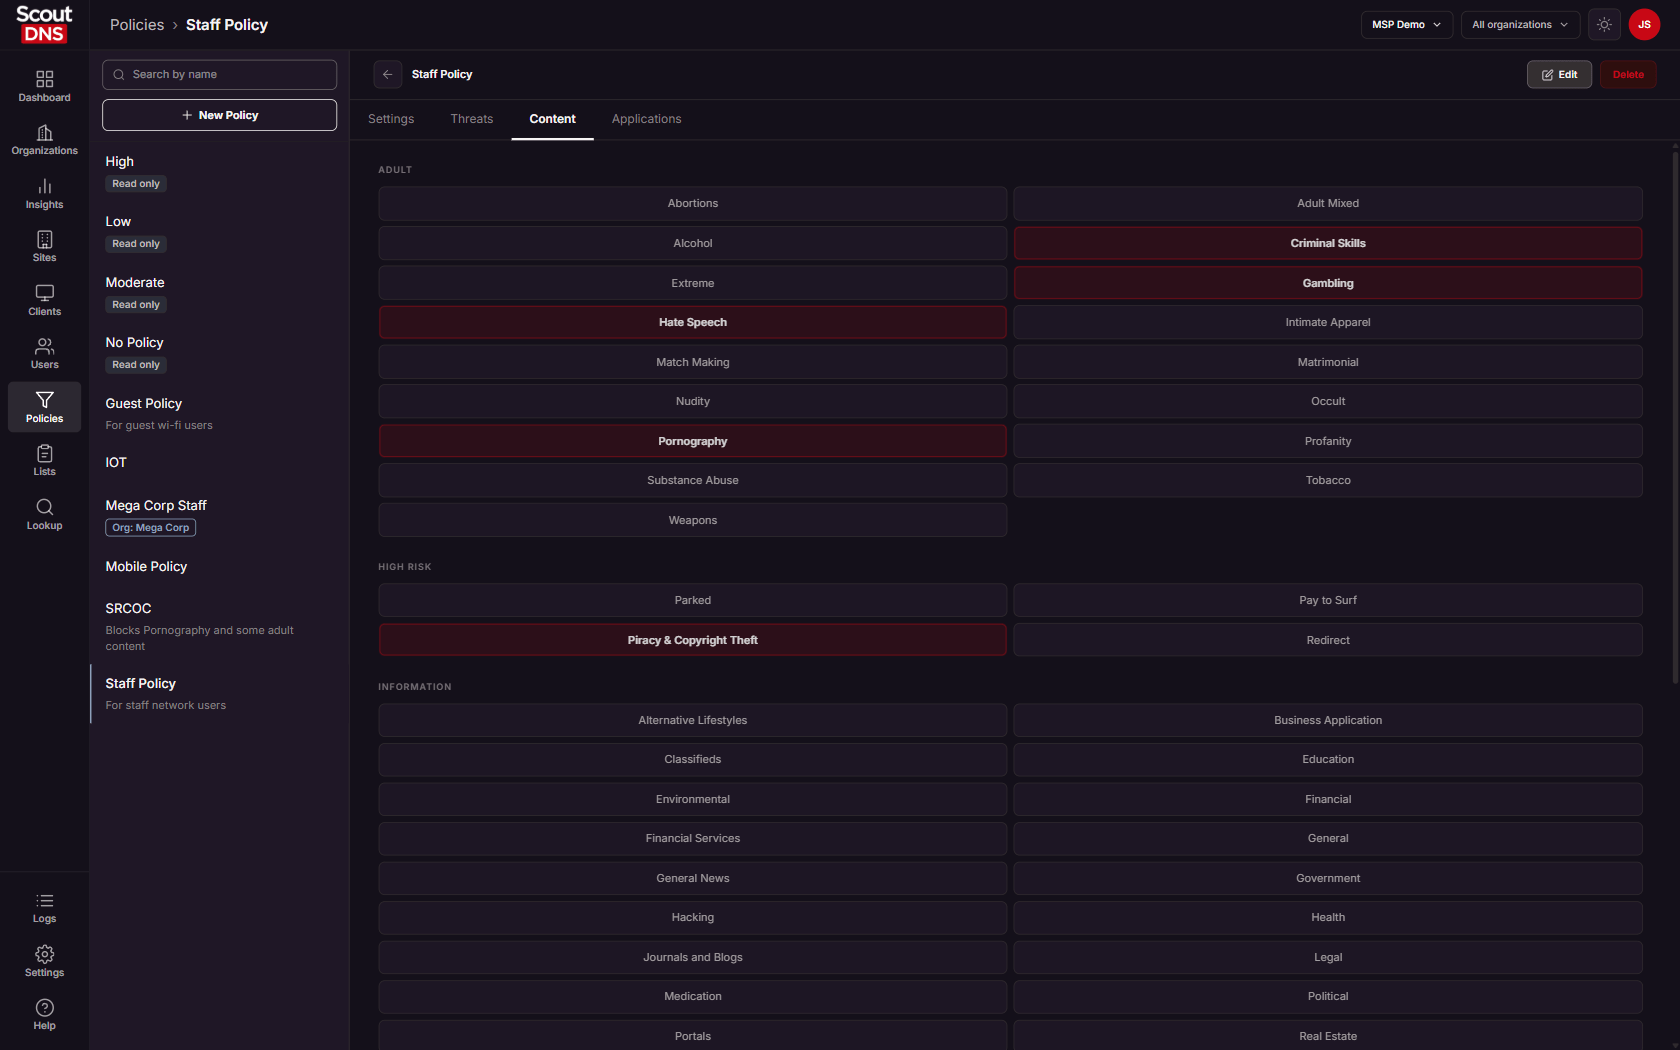
Each category is independent. There is no “block the whole group” button, and blocking a group heading does not cascade to the categories under it, so review the categories you care about individually.
Settings and advanced controls
The Settings tab holds the behavioral controls:
- Safe search, with three settings:
- Off, no enforcement.
- Enabled, forces the major search engines into their own safe-search mode.
- Enabled + Block Search Engines, does the same and additionally blocks search engines that cannot enforce safe search, so they cannot be used to get around it.
[!WARNING] Enabled + Block Search Engines is an aggressive setting. Use it with caution. “Search engine” is a broad classification, so this does not stop at general-purpose search. It commonly also blocks product search, travel search, and other search-style portals that users may need for legitimate work.
Pilot it with a small group before rolling it out widely, and expect to allow-list the search-based sites your business depends on. If you mainly want to keep explicit results out of general search, Enabled achieves that without the collateral impact.
- YouTube safe mode, with three levels: Unrestricted, Moderate, and Strict, which enforce YouTube’s own restricted modes.
- Ad Blocking.
- Advanced Settings, in the table below.
| Advanced setting | What it does |
|---|---|
| TLD filter | Apply Zero Trust TLD Filtering to the policy: None, Strict, or Custom to use one of your own TLD lists |
| Allow List Only | Deny everything except what the policy’s allow lists permit |
| Logging only | Log what would have been blocked without enforcing it, for piloting a policy before it goes live |
| Max Domain Length | Block domain names longer than the set character length |
| Block Unclassified | Block any domain that has no ScoutDNS category yet, which can catch newly registered domains |
Using custom lists with a policy
Custom allow and block lists are built on the Custom Lists page, then attached to a policy here. On the Settings tab, Allow / Block List (multi selection) lists your account’s lists; tick the ones this policy should use and Save.
Global lists work differently. A list marked global on the Custom Lists page applies to every policy automatically, so it appears in this picker with a globe icon, already ticked and greyed out. You cannot untick it for a single policy; to stop it applying, clear its global setting on the Custom Lists page.
A policy’s effective rules are every global list, plus whichever lists you select here.
Deleting a policy
Delete removes a policy after a confirmation. A policy that is still attached to a WAN, profile, or persona cannot be deleted; reassign or remove it from those first. Built-in templates cannot be deleted.
Deployments
A policy only does something once it is attached to a slot: a site’s WAN or LAN, a client profile, or a persona. Those attachments are normally made on the objects themselves:
- Sites, for WAN and LAN deployments
- Clients, where profiles carry the policy for enrolled devices
- Users, where personas map identity provider groups to policies
The Deployments view here does not replace those pages. It is the account-wide roll-up: every slot and the policy currently on it in a single list, with summary cards showing how much of your account is covered. Use it to audit coverage across sites, profiles, and personas, or to make a quick change without opening the object’s own page.
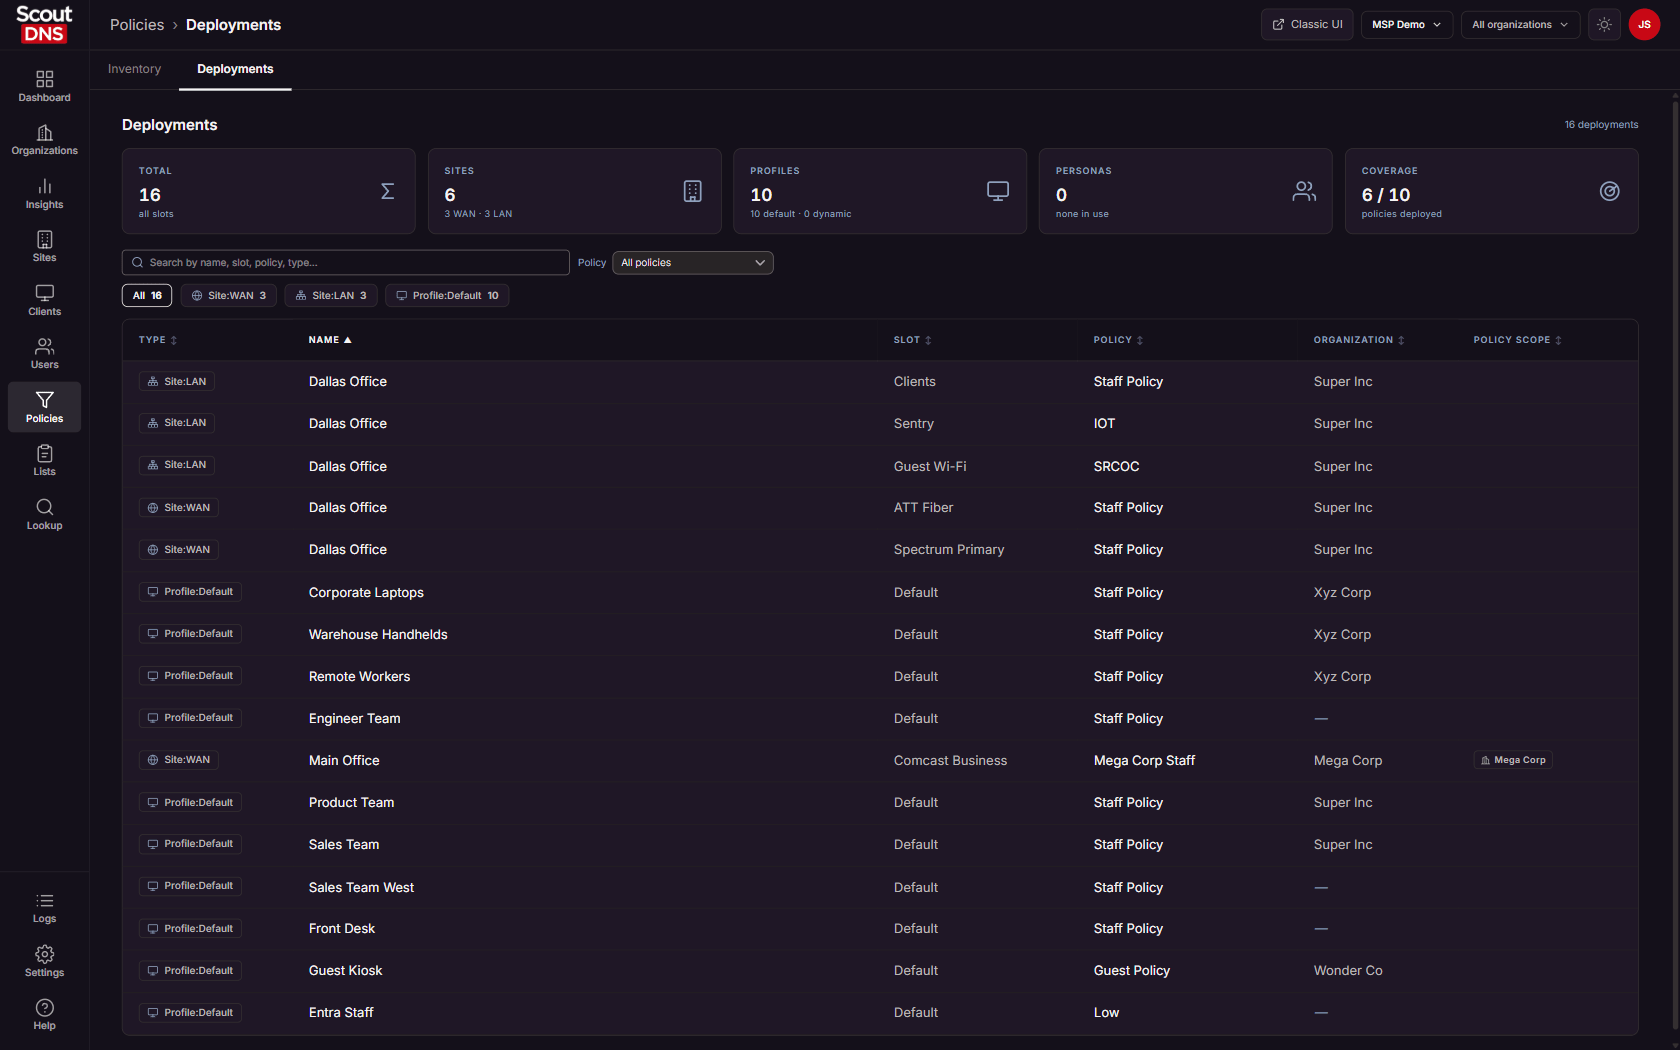
To change a slot from here, click its row, pick a New policy, and Save change. The picker hides policies that belong to a different organization than the slot.
For the step-by-step of assigning policies on the deployment objects, see Working with policies.
FAQ
I blocked every threat category but my Secure Score is only in the 40s. That is expected. The score rewards layered protection, not threat blocking alone; the Secure Score section above lists what to enable.
I clicked a toggle in a policy and nothing happened. The editor opens read-only. Click Edit first, then make your changes and Save.
Why can’t I edit the Moderate (or High, or Low) policy? Those are built-in templates. Copy one into a new policy to make your own editable version.
I can’t delete a policy. It is still attached somewhere. Open the Deployments view, move every slot using it to another policy, then delete it.
A policy shows “Open Threats” even though I block most threats. “Open Threats” flags any unblocked threat category, not only a policy with none blocked. Block the remaining threat categories to clear it.
Shopping, travel, or other sites stopped working after I changed Safe search. Check whether the policy is set to Enabled + Block Search Engines. That setting blocks anything classified as a search engine, which includes many product and travel search portals. Either drop back to Enabled, or add the specific sites to an allow list.
A custom list is ticked and greyed out in my policy and I can’t remove it. That list is marked global, which applies it to every policy account-wide. Clear its global setting on the Custom Lists page to stop it applying.
Why is a policy missing from the picker when I change a site’s policy? Policies tagged to one organization are hidden from slots that belong to a different organization. Check the policy’s scope.
Related
- Working with allow and block lists, the per-domain overrides a policy can use
- Zero Trust TLD Filters, TLD-level filtering a policy can apply
- Working with policies, assigning policies to WANs and LANs step by step
- Sites Overview - Network Deployments, where WANs and LANs get their policies
- Custom block pages, the page users see when a policy blocks a site