Browse Deployment & Agents
- Application categories (Zero Trust app management)
- Active Directory group policies
- Content categories
- Custom block pages
- Don't mix DNS providers
- Prevent DNS bypass
- Safe Search explained
- Safe Search supported search engines
- Security categories
- Working with policies
- Working with allow and block lists
- YouTube Restricted Mode explained
Relay setup and configuration
Install the ScoutDNS Relay inside your network for per-subnet policy, LAN-aware logging, encrypted upstream DNS, and local-domain forwarding to your domain controllers.
The ScoutDNS Relay is a lightweight service that runs inside your network. It acts as a local forwarding resolver: internal queries (to your domain controllers, printers, internal apps) stay on the LAN, while public queries are forwarded over DoH to the ScoutDNS cloud for filtering and logging.
Running a Relay unlocks:
- Per-subnet policy (different rules for different LANs)
- LAN IP in query logs (instead of just your WAN IP)
- Encrypted upstream DNS (DoH on port 443 to ScoutDNS)
- Local network aliases for forwarding to internal DNS
- Local DNS forwarding to domain controllers
- Automatic updates of the Relay software
[!IMPORTANT] The Relay is not a full DNS server. It does not host zones or serve authoritative records. It forwards queries to your internal DNS for configured local domains, and to ScoutDNS for everything else.

Cloud-configured architecture
The Relay is fully cloud-configured to keep install and management simple. Two steps:
- Install the Relay on a local host.
- Configure the Relay in the ScoutDNS UI.
ScoutDNS currently supports Debian-based Linux distributions (Ubuntu, Kubuntu, etc.) for the Relay service.
Install the Relay
Prepare the host
Minimum hardware requirements:
| Scenario | CPU | RAM | Storage |
|---|---|---|---|
| Single subnet, light usage | 1 | 1 GB free | 40 GB |
| Multiple subnets / forward rules | 2 | 2 GB free | 50 GB |
| Each additional 1,000 simultaneous users | +1 | +1 GB | (no change) |
Networking prerequisites:
- The host will act as DNS for every subnet that uses it, so every subnet must be routable to the host.
- The Relay host itself should point at your local DNS server so non-forward-specified local queries still resolve.
Download the installer
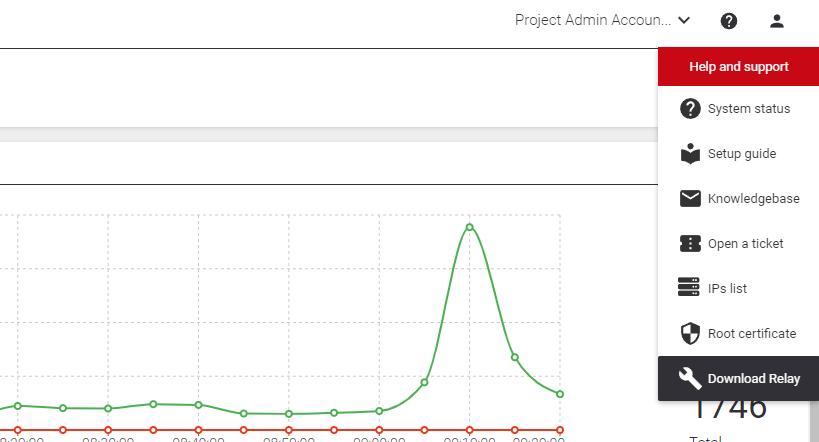
In the Admin Console, click the Help icon (top right) and download the install file.
Copy the file to your Relay host and unpack it.
Install the service
sudo ./scoutdns install-dnsThe service starts automatically once installed and self-updates to the latest version when one is available.
Service control commands
# Check service status
sudo systemctl status scoutdns scoutdns-updater

# Restart the relay
sudo systemctl restart scoutdns

# Tail service logs
sudo journalctl -u scoutdns -u scoutdns-updater

# Export logs for a support case (since yesterday)
sudo journalctl -u scoutdns -u scoutdns-updater -S yesterday > scoutdns_log.txt
Uninstall
sudo /opt/scoutdns/scoutdns uninstall-dnsWhen the service is stopped or uninstalled, the host’s DNS settings are automatically reverted.
[!NOTE] The Relay sends all upstream DNS queries to ScoutDNS using DoH over port 443. No port 53 outbound is required for normal operation.
Configure the Relay in the ScoutDNS UI
Before the Relay can be detected, its WAN must already be configured in the Admin Console. See the Quick Start Setup Guide: WAN Forwarding for the initial WAN setup.
Once the Relay is installed on a configured WAN, it registers itself with ScoutDNS and appears under Sites → [your site] → Relays with status Not Adopted.
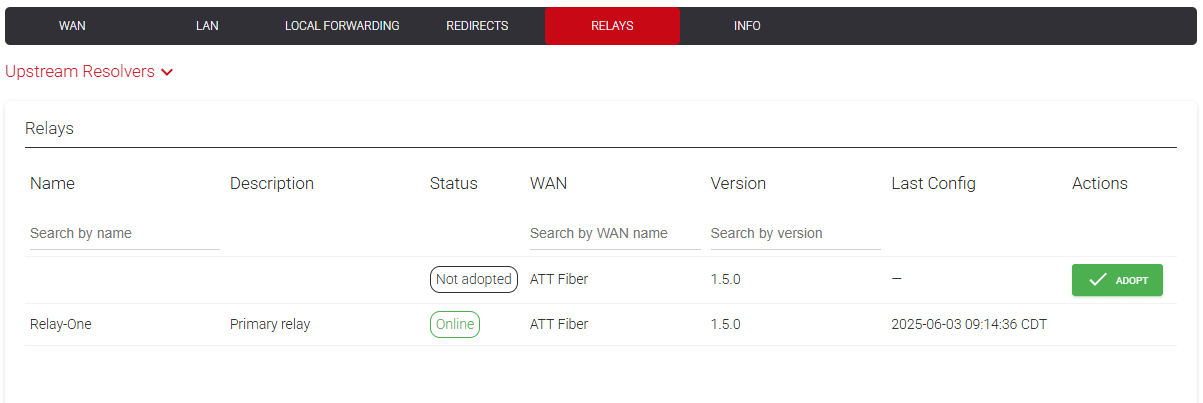
Click Adopt to bind the Relay to the site. The Relay then polls the configuration service over HTTPS, picking up new settings within 1 to 2 minutes.
[!TIP] Install multiple Relays on the same site for high availability. They share configuration and clients can fail over between them.
Upstream resolvers
By default the Relay forwards to ScoutDNS’s global anycast network over DoH in a fail-closed state. You can switch to other upstream services (Google DoH, Cloudflare DoH), but those are unfiltered: no ScoutDNS policy applies unless ScoutDNS DoH is the upstream.
Fallback DNS (fail-open)
Enabling fail-open lets the Relay forward to backup resolvers when the ScoutDNS network is unreachable. Up to four backups.
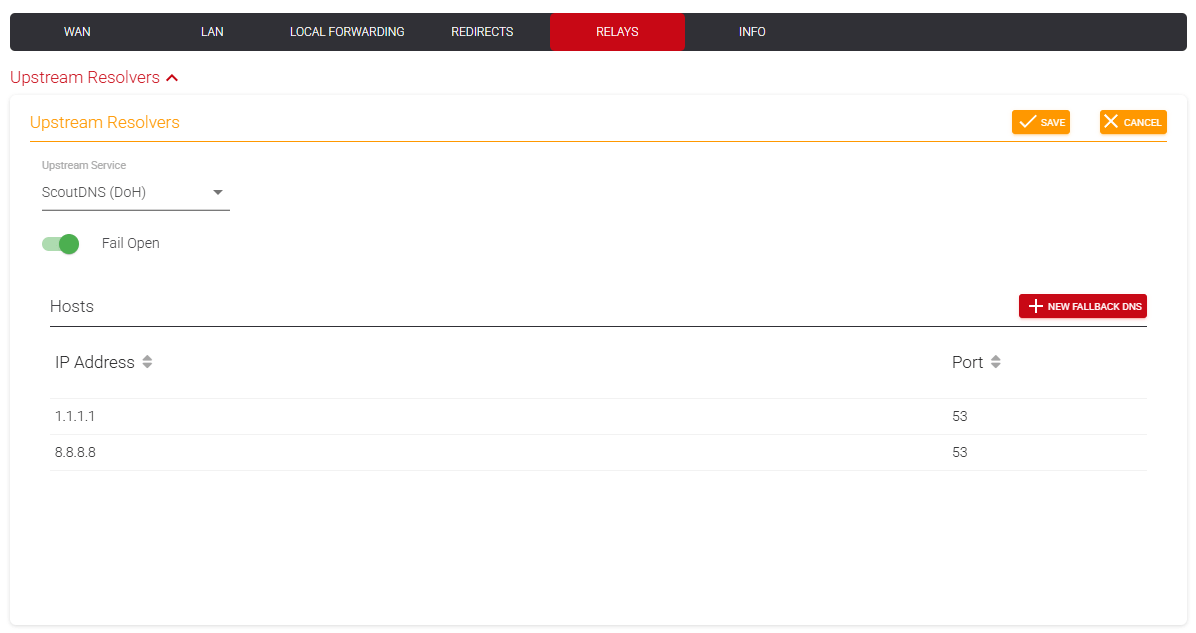
[!WARNING] Fail-open queries use standard port 53 DNS, not DoH. Allow outbound port 53 from the Relay host through your firewall if you enable this.
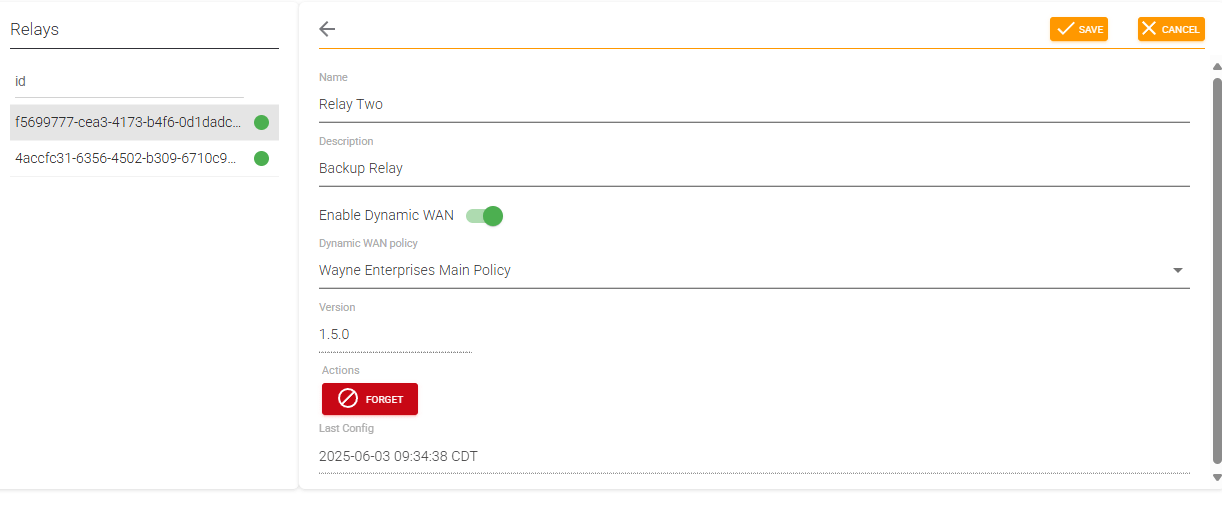
Dynamic WAN
Under normal conditions the Relay uses the site’s WAN IP as a unique identifier, so the WAN must be static (or kept current with a dynamic-DNS updater). For double-NAT or rapidly-rotating ISP IPs, that updater can lag.
Enabling Dynamic WAN decouples the Relay from the WAN IP after adoption. Traffic is still associated with the site for logging.
Since the Relay normally inherits the WAN’s policy as a default for unconfigured subnets, you must pick a fallback policy when Dynamic WAN is on. Turn on the Dynamic WAN switch and select a Dynamic WAN Policy from the dropdown.
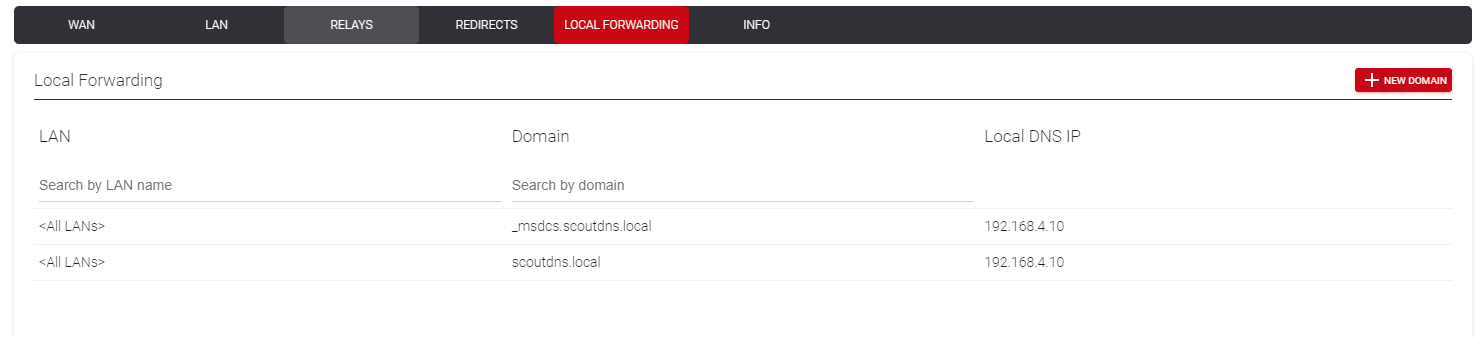
Local forwarders
Tell the Relay where to send queries for internal domains (Active Directory, internal apps, etc.). In the Local Forwarders subtab:
- Click + New Domain.
- Enter the local domain name (e.g.
corp.example.com). - Add up to 4 forwarder IPs (your domain controllers, internal DNS).
- Choose which configured LAN the rule applies to, or leave All LANs.
- Save.
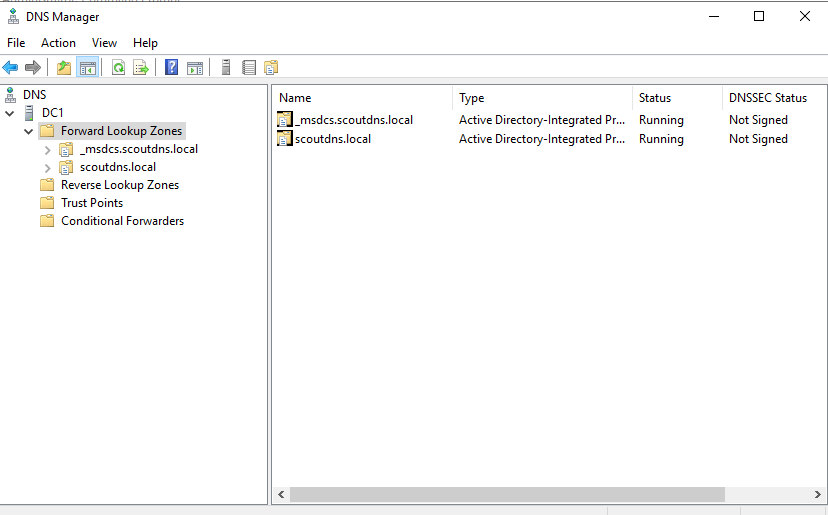
Forward lookup zones
Add every domain listed in your domain controller’s Forward Lookup Zones. From Windows DNS Manager, identify each forward-lookup zone and create a matching forwarder entry in ScoutDNS.
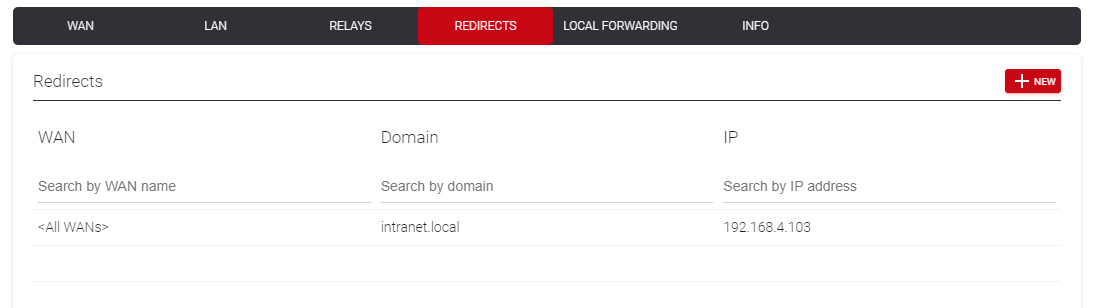
Redirects
Redirects let you point a specific domain at a specific IP, useful for internal printers, video players, or overriding any internal/external domain to a custom IP. Effectively manual DNS records for Relay-connected devices.
- Open the Redirects subtab → New Redirect.
- Enter the domain and target IP.
- Save.
[!WARNING] Redirecting a domain that has an existing TLS certificate will cause certificate errors in browsers. Use redirects for internal-only hostnames or accept the cert warning.
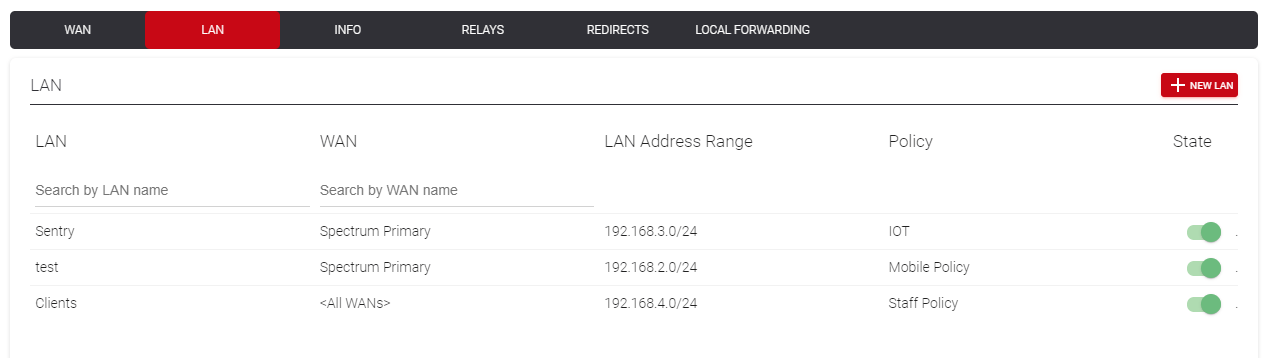
LAN
LAN rules let you apply different policies to different subnets. To add one:
-
Click + New LAN.
-
Pick the WAN it applies to (default: All WANs).
-
Name the LAN (shown in reports and other tabs).
-
Set the IP range. Examples:
192.168.3.0/24 10.10.0.1/22 10.10.0.1/20 172.16.0.0/21 -
Assign one of your existing policies.
-
Save.
You can also specify individual IPs to give one device its own policy. Pair this with a static IP or DHCP reservation so the device’s address doesn’t change.
Test the Relay
Before pointing client devices at the Relay, verify it resolves both public and local queries from every subnet you plan to use it on.
Public DNS test:
nslookup test.verify.scoutdns.com <RELAY_HOST_IP>test.verify.scoutdns.com only resolves through a configured ScoutDNS network, a successful answer confirms the Relay is reaching ScoutDNS and returning results.

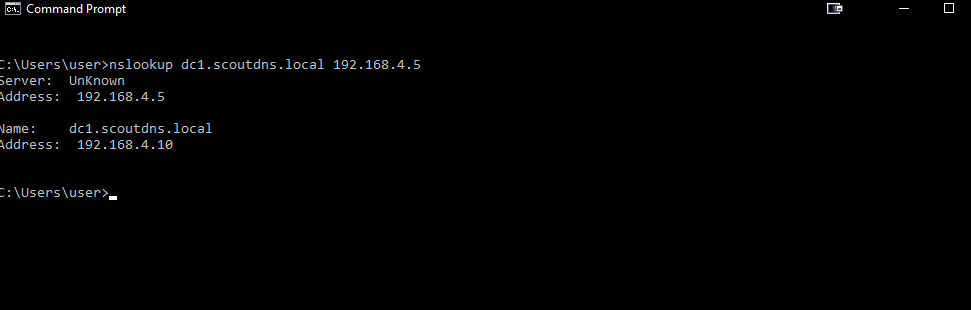
Local DNS test:
nslookup example.yourlocaldomain.corp <RELAY_HOST_IP>This verifies the Relay is forwarding correctly to your local DNS for internal domains.
If either resolution fails, confirm the Relay host is online and reachable (ping/route) from the affected subnet. If you run multiple Relays, repeat both tests against each Relay’s IP.
Point local clients at the Relay
Configure your DHCP server to hand out the Relay host IP(s). With multiple Relays installed, hand out multiple IPs for redundancy. Test every Relay before rolling out broadly.
[!IMPORTANT] Do not mix DNS server types on client devices. Don’t combine a Relay IP with a domain controller IP, a ScoutDNS Anycast IP, or any other resolver in the same DHCP option. Mixed sets produce inconsistent policy enforcement and some queries won’t be logged or filtered.
[!TIP] Best practice: manually set the Relay as DNS on a handful of test devices across each subnet, validate behavior, then push the change via DHCP.
Existing IP leases
DHCP renewal pushes new DNS settings to clients. For domain-joined machines under Group Policy you can force this via:
ipconfig /renewrun via batch file. Unmanaged devices need a manual renewal or a restart.
Support boundary
[!NOTE] In scope: ScoutDNS supports installation and configuration of the Relay service on qualified hosts, and the cloud-side GUI configuration.
Out of scope: ScoutDNS does not provide support for local network configurations, host OS/networking issues, Windows domain controllers, or DHCP configuration in Windows or other vendor equipment. Please consult the relevant vendor documentation for those areas.